Our dryer is almost 8 years old and I have noticed it has been taking longer than usual to fully dry our clothes. My husband immediately started shopping around for a replacement, but I started to wonder if there was anything we could do to extend the life of our machine until we can save up for a new set. I found a tune-up kit on Amazon that says it was universal for front-loader washing machines. So I ordered it and got ready for my new role as handy-woman.
In the kit I received, there was a very detailed set of instructions with pictures for installing each of the new parts in my tune-up kit. Sadly, the pictures were made from black and white copies of pictures that were less than desirable for elucidating the instructions. But overall the project itself was manageable and doable. Since it was doable (if I can do it, anyone can!), I thought I would show you how to tune up a dryer and include detailed, clear pictures to go along with the instructions.
You likely do not have the same model of dryer we have, but as I was doing my research, I discovered that each dryer is made up of the same parts, put together the exact same way, with very few differences. The parts you will be replacing are parts every dryer has. The only thing that will be different is the process for getting into the dryer – taking off the top panel and the front panel.
When you are giving your dryer a tune-up, you are doing a number of things:
- Extending the life of your machine
- Reducing noise from the machine
- Improving drying time for your loads of laundry.
- Cutting down on the risk of a dryer fire.
And you will be replacing three major components, during this process:
- The top and bottom felt on the door.
- The belt and idler pulley on the drive motor.
- The hitch and grounding ball (and associated parts) on the drum.
Before you begin, I recommend that you enlist a partner to help you with your project. My husband helped me through most of the steps and I found many of the parts of the process run smoother with an extra set of hands.
You will also need to get a putty knife (or a razor blade, like I used), a Philips head screw driver, a flat head screwdriver, and a socket driver (you can get all three of these tools in a kit like this one. All the other items you need are included in your tune-up kit. As you are working, you will discover a LOT of lint in the dryer. I used my vacuum hose to clean it up as I worked – this cuts down on a fire risk.
Are you ready? Let’s get started.
The very first thing you need to do is cut off the gas (if you have a gas dryer) and unplug your dryer from the wall outlet – safety first! To cut off the gas, you will likely have to pull out your dryer and get behind the dryer. The gas only has an on and off position, so you just need to turn it the only way it will go.
Next, while you are still behind the machine, take off the rear access panel of the dryer and the dryer vent hose (you will need a Philips head screwdriver for this).
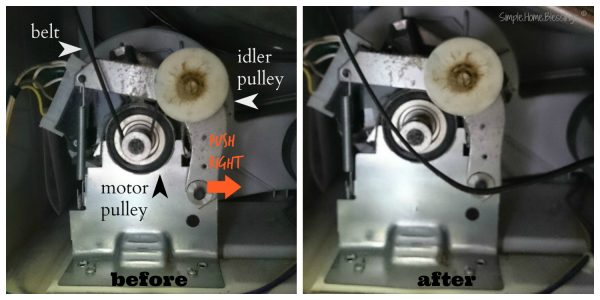
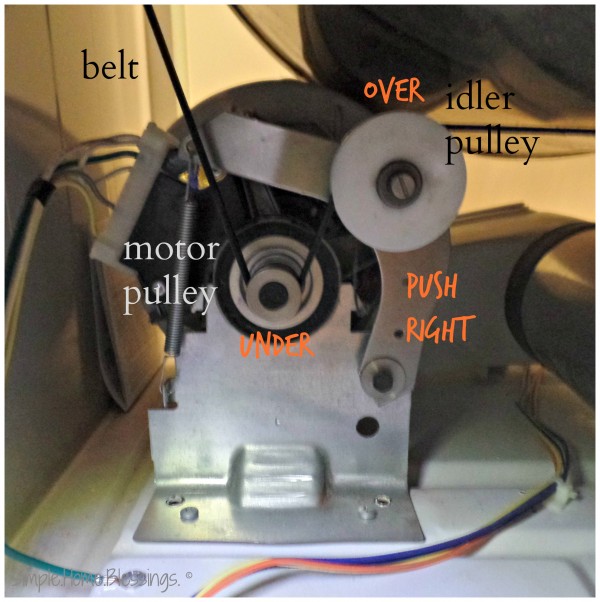
Inside the rear access panel, you will see the drive motor and idler pulley and a belt. Push the idler pulley to the right to slip the belt off of the motor pulley.
Next you need to remove the top panel. There are two options for removal depending on the type of dryer you have. One option is hinged in the back with clips in the front. Remove the top panel by using your putty knife to pry it open at the front and pull up toward the hinge. The other option has a panel slid under the front panel and attached at the back with two screws. Remove the panel by removing the screws with a screwdriver and pushing the panel back away from the front clips. Set the panel aside (you will not need it for the remainder of this process).
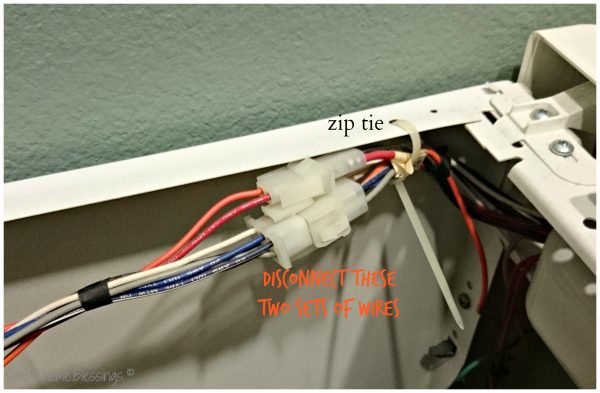
You have already turned the power to the dryer off by unplugging it from the wall outlet, but you also need to disconnect two sets of wires. They are found at the top of the dryer under the top panel. They are usually held to the dryer by zip ties. Cut the zip tie closest to the connections and disconnect these wires.
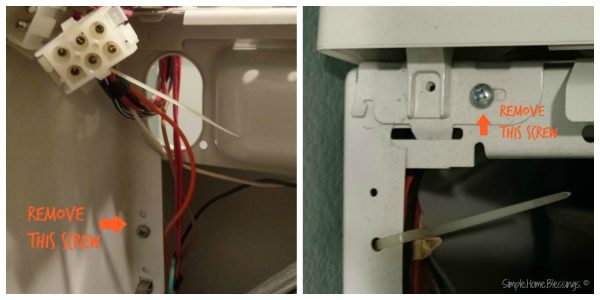
Now you are ready to remove the front panel. You will remove this based on how you removed the top panel. If you have a hinged top model, you will need to find the two screws on either side of the front panel (about 6 inches from the top), remove them, and pull the panel forward and lift up to remove it. If your top panel is attached with screws in the back and you have a front mounted control panel, locate the the two screws that hold the control panel to the frame and the screws on the front panel (about 6 inches from the top), remove them and pull the panel forward and lift up to remove it completely. You may have a model that also has screws at the bottom of the front panel attaching it to the frame. If so, slide something under the dryer to prop it up and remove the screws.
Lean the front panel against a wall with the front panel facing the wall. You will be working on the interior of the front panel.
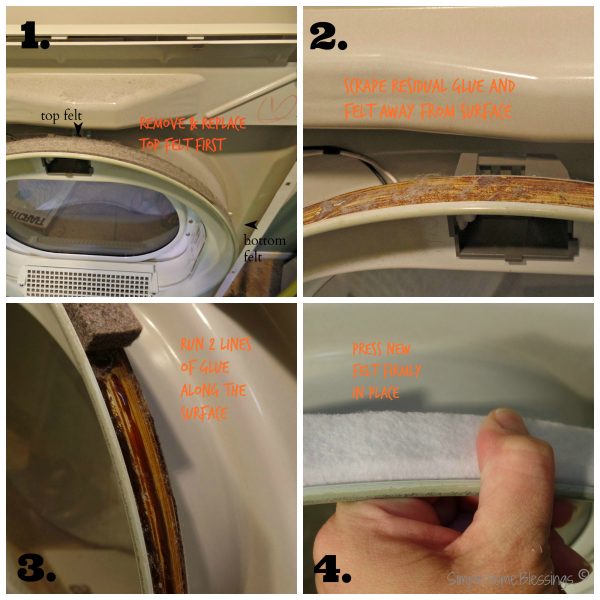
You are now ready to replace the top and bottom felt on the door. You will notice your kit came with two lengths of industrial felt. The shorter of the two felts is the top felt. It runs along the top curve of the door. You need to remove the old one first. Do not remove both felts at the same time. Remove just the top felt, first; replace the top felt and then remove and replace the bottom felt.
To remove the felt, simply take one end of the old felt and pull the felt off of the door. It should be a simple removal. But you will likely have residual felt and glue. To remove the remaining felt and glue, scrape it off with a putty knife (or a razor blade, as I did). You are not going to get every last trace of the glue off the door. The surface just needs to be smooth and prepped for reapplication of glue and felt.
To replace the top felt, apply a line of high temperature glue along the old line of glue. Follow along (about 1/2″ away) with another line of glue. Let the glue sit for a minute or two, so it can get very tacky. Apply the new top felt to the door, starting at one end and working quickly toward the other end. Press down on the felt to insure it adheres to the glue and the door.
To replace the bottom felt, follow the same procedure for removing and replacing the top felt; but work in sections. Since the bottom felt is much longer and goes around the bottom of the door, working in sections helps to ensure it sticks properly. Make sure you press down firmly on the felt to insure it adheres.
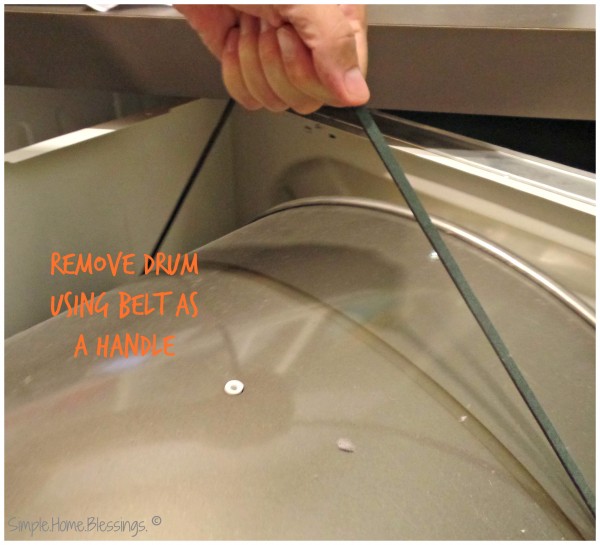
Next, remove the drum from the dyer frame. This is a little tricky. It helps to have a partner to help you with this. If the belt for your dyer is still in tact, use it to help with this process. Basically, you are just going to pull up on the drum, using the belt as a helper. This requires a bit of force. Once the drum is free from the hitch, pull it through the front of the frame and set aside.
You are now ready to replace the next components: the ball and hitch.
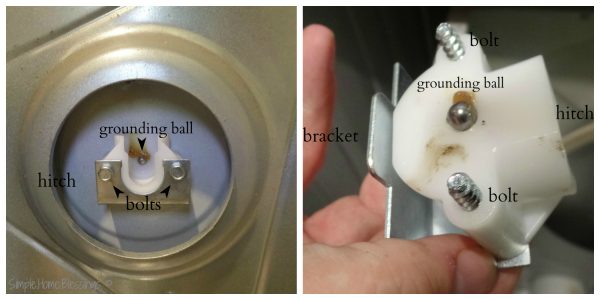
The hitch is located on the rear panel of the dryer. Remove the bolts from the rear panel of the dryer using the socket driver. You will dispose of this entire hitch as your tune-up kit comes with all new parts for your machine. Assemble the new bracket, hitch, grounding ball and screws just like the old one (as shown in the picture). Install new hitch to the rear panel of the machine, making sure not to let the grounding ball fall during the process.
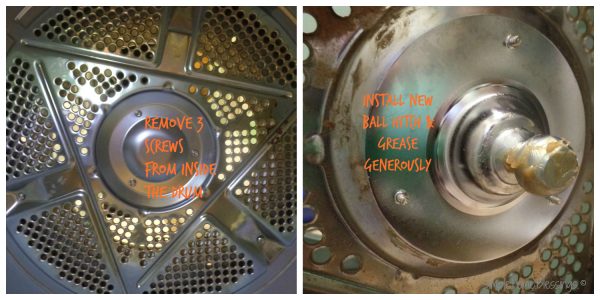
Next, work inside the drum to remove the ball hitch. Remove the screws inside the drum with a Philips screwdriver and remove the ball hitch. Install the new ball hitch from your kit with the three Philips head screws. Thoroughly grease the ball hitch and the socket of hitch inside the bracket on the back panel of the dryer with the supplied high temperature lubricant.
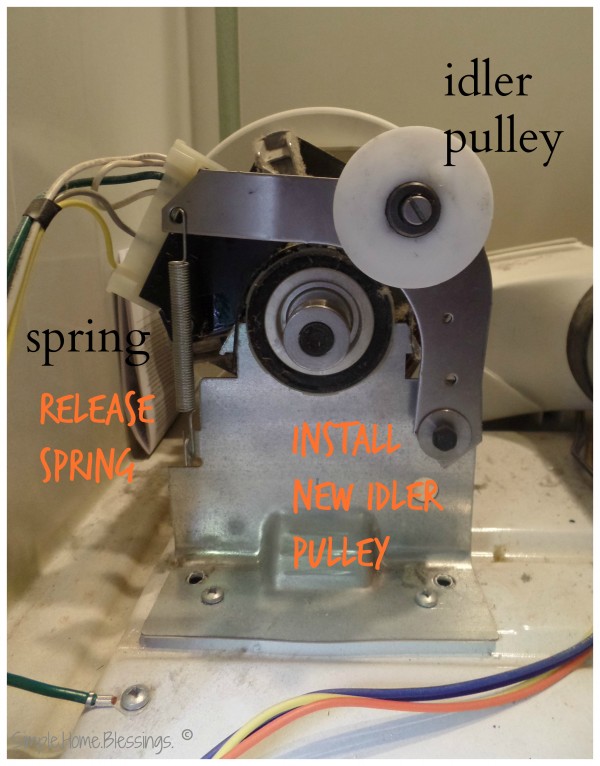
Then go to the back of the machine again and work to replace the idler pulley. Release the spring to release the idler pulley and remove it. Replace with the new idler pulley from your kit and reattach the spring.
Now it is time to put the drum back in the machine. Pick up the drum (using the old belt as a handle) and slide it through the front opening in the frame. Set the ball hitch inside the socket on the rear panel. Once the drum is back in place remove the old belt and replace it with the new one. You will need to slide the belt between the drum and the blower housing. You might need to lift the drum slightly to create space to slide the belt in.
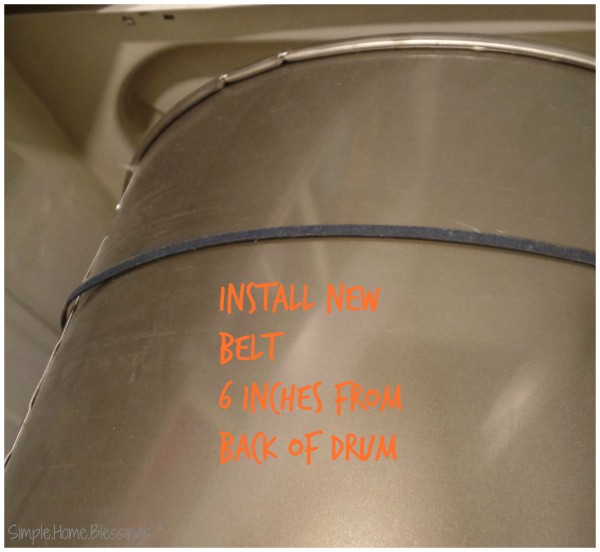
Install the belt by insuring it is not twisted at any point and positioning it about six inches from the back of the drum. You will likely have a mark where the old belt was to use as a guide. We positioned our belt with the ribbed side facing the drum.
Secure the belt to the drive motor in the back of the machine by pushing the new idler pulley to the right and putting the belt on the pulley. Pull the belt under the motor pulley and push the idler pulley back into place. Make sure the spring is still secure.
You have now completed your tune-up! Just work in reverse to put the front panel back on the frame. Connect all disconnected wires. Then replace the top panel and rear access panel. Reconnect dryer vent hose and turn gas back on, plug the machine back in. Set the machine back in place and use as you would normally.
YOU DID IT! (my celebration included a dance, but it is optional!) Now your dryer will last longer and function even better than before, it’s a win-win! Come back and let me know how it goes.
Leah
Visit Leah over at her blog to get tons of tips and creative ideas. Here are just a couple of the things she’s been working on lately.


More washing machine posts!
How to Clean a Washing Machine
How to Clean a Washing Machine (Top Loader)
How to Clean the Inside of the Washing Machine

Oh my gosh those were the best instructions ever. Thank you for sharing this
great info.
This is great advice! New appliances are such a huge expense 🙁 so it’s important to try and make them last.
My dryer was gradually taking longer to dry too and then suddenly heating completely. I googled around and learned how to test parts using a multimeter. Turns out my gas valve coils were bad (they can act fine during the beginning of a cycle and stop working during the end so no gas=no heat and longer times to dry). it was about a 15 minute repair and only cost me $20.
Honestly, after a little research I found that most dryer repairs can be diy with relatively little effort and for around $20 or so for the parts. There’s like 6 parts that tend to break on 80% of dryers.. It looks intimidating but they’re are a lot of great YouTube videos and the process is very straightforward. Just an FYI incase yours stops heating all together and the idea of shelling out hundreds of dollars for a new one or a repairman make you a little dizzy.
Just changing out or cleaning out the tubing that goes from your dryer to the outside can improve performance tremendously. The damp moist air flows away from the dryer more easily. We change out ours annually now after the first time we did it. We had owned the house for several years and the ducting was probably 75% clogged with lint! It was a) a wonder it didn’t catch fire and b) incredible how quickly a load of towels dried with a clear duct!
Two additional things to add:
1) A cleaning should be done every 6 months to avoid dryer fires. While we often clean the lint trap, the machine does gather lint in the bottom of that area near the blower fan and if too much accumulates, it can catch fire SO easily. In fact, if you touch a spark to dryer lint, you will see it takes almost no effort to get a full flame quickly. So spend $20 to buy a dryer cleaning kit that will allow you to vacuum out the lint trap area and the tubing to the outside.
2) If the dryer takes two cycles to really dry things, the heating elements may be dying. These can be replaced by removing 4 screws inside the back cover. Now, the rear cover may include 12-20 screws to remove it and then the element has another cover with 4 screws. But it is a simple unscrew & unplug to replace the elements.
*** And while you have the rear cover off, remove the cover around the lint trap area. Even if you do the cleaning with the kit like I do every 6 months, I recommend once every year or two (depending on frequency of use) removing the lint trap cover to allow access to the blower fan area. You will probably notice a LOT of lint collected here. Remove that to reduce your fire risk. I pulled up to a baseball sized wad out of mine each time.