Today, I’m giving you some tricks for how to make carved pumpkins, and Jack-O-Lanterns, last longer and prevent rot. Let’s get carving!
Fall is pretty much upon us, and that means Halloween is just around the corner, which means trips to the pumpkin patch! So today, I’ll be giving you a tip for how to make carved pumpkins, and Jack-O-Lanterns, last longer. I’ve also got a few tips that will make carving your pumpkins a little easier! Let’s start with those:
Pumpkin Carving Tips
Step 1 – Cut a Hole in the Bottom of Your Pumpkin Instead of the Top
After washing all the dirt off your pumpkins, cut a hole in the bottom. This is a great idea for a couple of reasons. First of all, it makes the design of your pumpkin look cleaner! And second, it makes candle lighting so much easier! When you cut the hole out of the bottom, toss it. No need to keep it around as you won’t be able to tell it’s even gone! When you are ready to give your pumpkin light, simply lift it up and place a lit candle inside.
Step 2 – Use a Metal Ice Cream Scoop to Scrape out the Seeds
Because it’s stronger and bigger, a metal ice cream scoop will work better than those plastic scoopers that pumpkin carving kits provide, for scooping out the pumpkin guts. Be sure to keep the seeds for roasting!
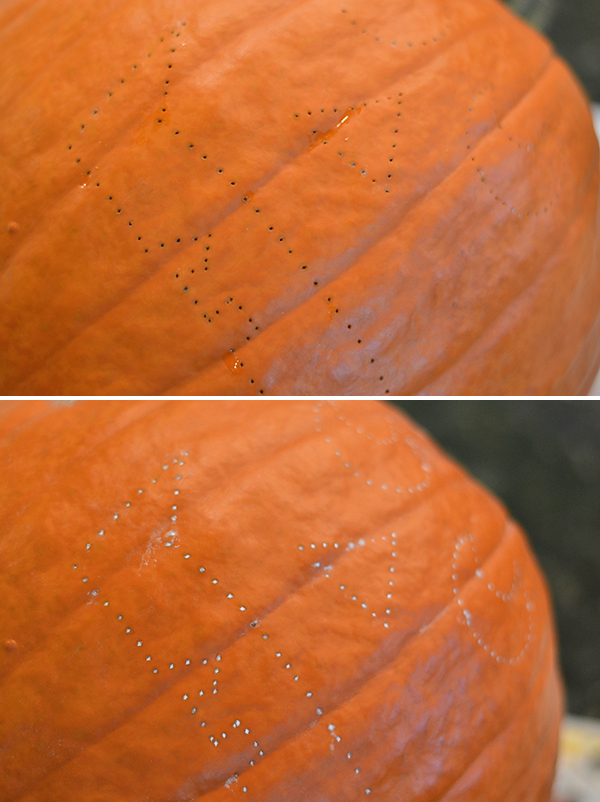
Step 3 – Sprinkle Flour over Nail Holes to See them Better
If you use the nail hole method for carving your pumpkin, sprinkle a little flour over the holes to make them more visible!
Once you’ve got your pumpkin carved, you’ll probably want it to last a little while on the front porch, for all the trick-or-treaters! Follow these next few tried-and-true tips to keep your carved pumpkin looking good for an extra couple weeks!
How to Make Your Carved Pumpkins Last Longer
Step 1 – Soak Pumpkins in a Bath of Cold Water
Fill a sink or tub with cold water and add some ice cubes. Place your pumpkin in the water and let it soak for 3-5 hours. It will absorb the water, making it firm. When you take it out, dry it off immediately to prevent mold and unwanted moisture.
Step 2 – Rub Petroleum Jelly on the Cut Parts
Apply Petroleum Jelly (aka Vaseline) to all cut edges. This will help keep them from drying out! If you don’t have Petroleum Jelly, you can also use vegetable oil or olive oil.
Step 3 – Spray Pumpkins with Bleach Water to Keep them Moist
Fill a spray bottle with water and a teaspoon of bleach. Mist the inside of pumpkins daily to keep them moist. The bleach will keep mold at bay, it will kill any unwanted bacteria and it will slow down the decay process.
If you don’t want to use bleach to make your pumpkin spray, you can also use a few drops of peppermint essential oil, which has anti-fungal properties.
I tried these pumpkin preservation tips out last year on the pumpkin to the left.
After seven days this is what they looked like:
While the one on the left wasn’t perfect anymore, it was in much better shape than the one on the right which I didn’t do anything to. The treated pumpkin ended up lasting another week after this. So, if you carve your Halloween pumpkins a few weeks before Halloween, try these tips to make them last longer and slow down the rotting process!
Another tip to slow down pumpkin rot, is to use flameless candles, instead of real candles with a flame. Using flameless candles will keep the temperature of the pumpkin cooler, which will slow down the decay process, instead of cooking the pumpkin from the inside. In addition, if you live in a warmer climate, consider storing your pumpkins in the fridge at night so they can cool off, after a day in the warm sun.
Happy carving!
Kim
A Real-Life Housewife
If you saved your seeds, CLICK HERE for a delicious recipe to cook them!


Seriously fantastic pointers!!!
I never knew you could preserve it longer! Great advice! I’ll have to keep these in mind if we decide to carve pumpkins this year.
These are such great tips! We live in the south and last year it was so warm that my pumpkin was utterly moldy in two days … it was so disappointing!
Oh such great tips! Living in the south, those pumpkins can go to mush in a hurry, will definitely be using these this year!
Wow those are excellent tips! I had no idea! 🙂
Amazing tips! I thought I’d heard them all but these are all new to me. I never thought about carving the bottom or putting flour on the holes!
This is awesome!! Our Pumpkins always start caving in on themselves before Halloween, so we will definitely be doing this!!
We live in the south, and ours are always shriveled up a few days after carving. On Halloween day, I soak ours in either a cooler or a bathtub full of water for several hours. They replump beautifully, but will literally soak up an entire cooler’s worth of water, making them heavy. But it works very well!
Just as a warning a while at the bottom may cause sinking if you have your pumpkin out for a while.